Thursday, June 3, 2010

Chocolate Pecan Pie

Another hit from the Baked Cookbook!
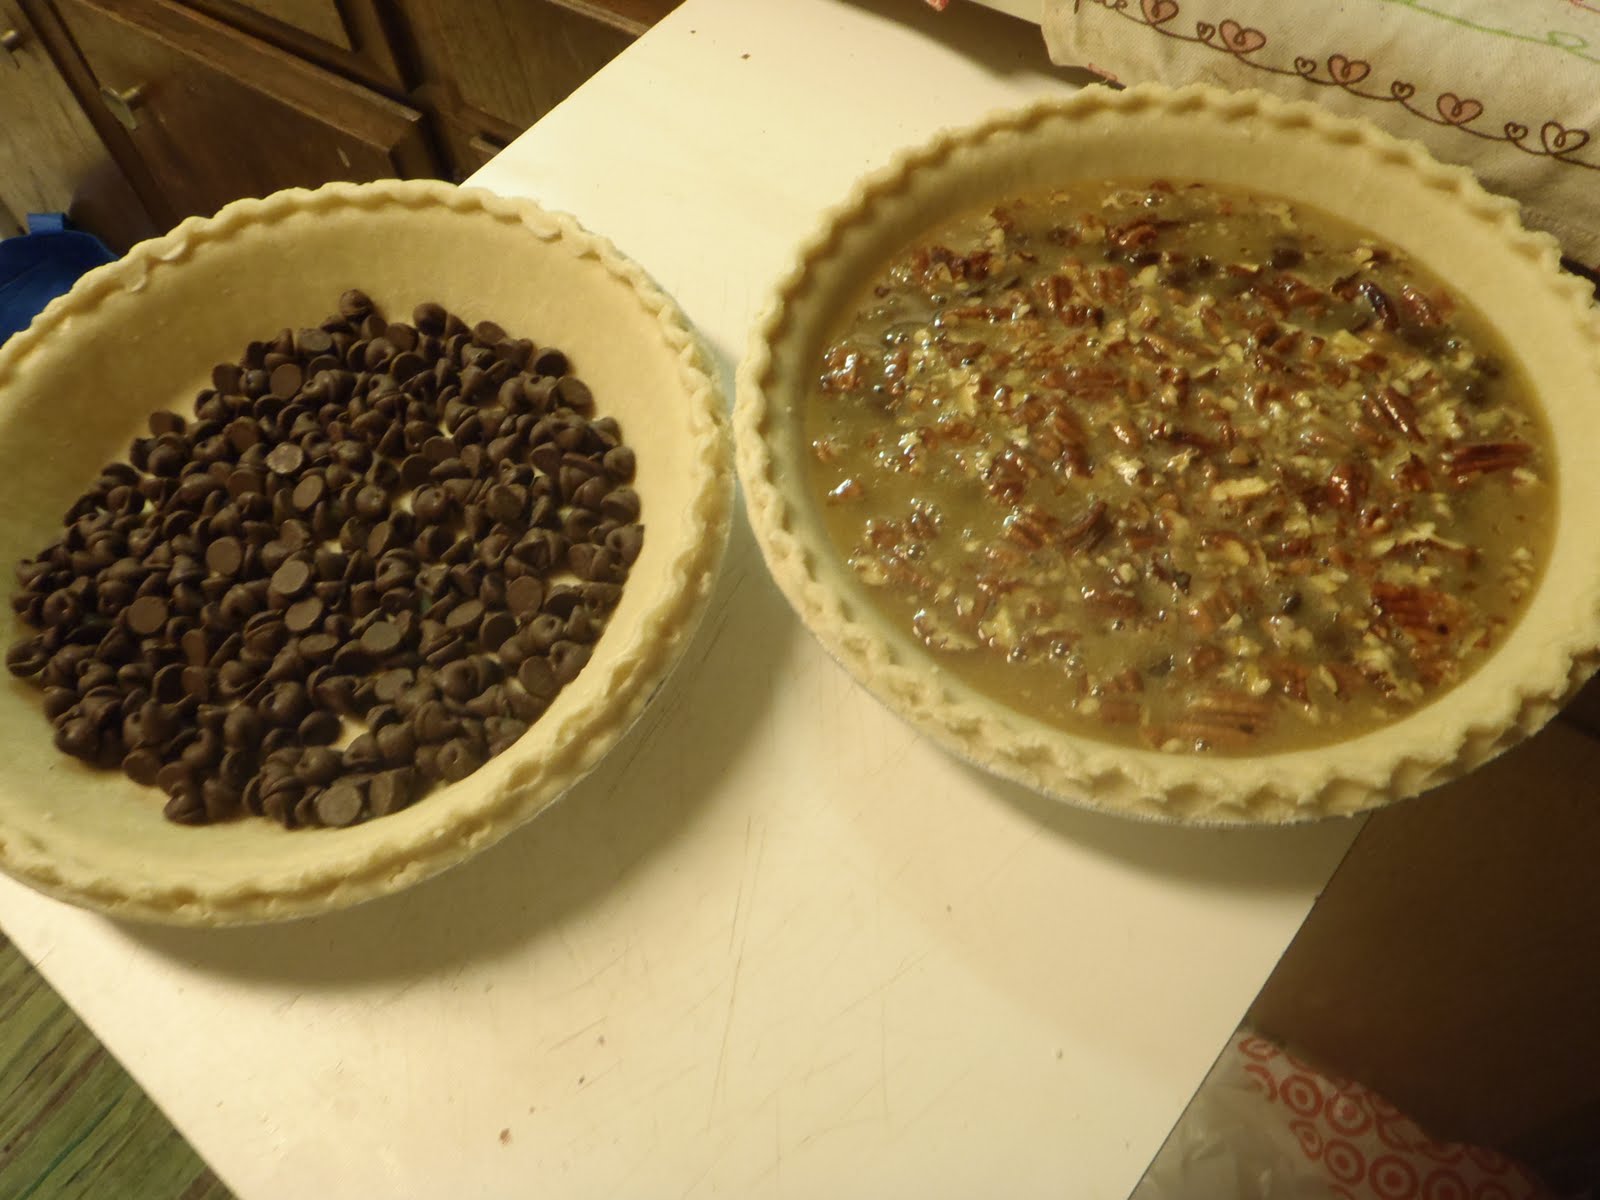
Chocolate Pecan Pie...I was short on time, but really wanted to make this, so I ended up using a premade crust for it. And of course, one pie wasn't enough so I doubled the recipe and made two! :) It was a good thing I did because they were quickly consumed at the office I didn't have any bourbon, so I opted out of using that, and it came out just fine.

Baked - Chocolate Bourbon Pecan Pie
1 ball of Classic Pie Dough (below), chilled (Recipe below, or just cheat like me and buy it)
2 cups pecan halves, toasted
3 large eggs
¾ cup light corn syrup
3 tbsp. sugar
4 tbsp. firmly packed dark brown sugar
2 tbsp. unsalted butter, melted
Pinch of salt
1 tsp. pure vanilla extract
3 tbsp. bourbon
1 cup (6 oz.) semisweet chocolate chips
Dust work surface with a sprinkling of flour. Unwrap the ball of chilled dough and put it directly on the work surface. Roll out into a 12-inch round. Transfer the dough to a pie dish and carefully work it into the pie dish, folding any overhang under and crimping the edge as you go. Wrap and freeze the crust until firm, about 2 hours, or up to 3 months.Preheat the oven to 325 degrees F. Coarsely chop ¾ cup of the pecans. Set aside.In a large bowl, whisk the eggs until combined. Add the corn syrup, sugars, butter, salt, vanilla, and bourbon. Whisk again until combined. Stir in the chopped pecans and set the filling aside.
Spread the chocolate chips evenly along the bottom of the frozen pie shell. Slowly pour the filling on top of the chocolate chips. Arrange the remaining 1 ¼ cups pecan halves on top of the filling.

Bake in the center of the oven for 30 minutes, then cover the edges of the crust loosely with the aluminum foil and bake for another 30 minutes. Test the pie by sticking a knife in the center of the filling. If the knife comes out clean, the pie is done. If the knife comes out with clumps of filing sticking to it, bake for another 5 minutes and test again.
Cool the pie on a wire rack and serve warm or at room temperature. The pie can be stored in the refrigerator, tightly covered, for up to 2 days.

Classic Pie Dough
Yield: 2 balls of dough, enough for 2 (9-inch) single-crust pies or 1 (9-inch) double-crust pie

3 cups all-purpose flour
1 tbsp. sugar
1 tsp. fine salt
1 cup (2 sticks) cold unsalted butter
¾ cups ice cold water

In a medium bowl, whisk together the flour, sugar, and salt together.

Cut the cold butter into cubes and toss the cubes in the flour mixture to coat. Put the mixture in the bowl of a food processor and pulse in short bursts until the pieces of butter are the size of hazelnuts.

While pulsing in quick, 4-second bursts, drizzle the ice water into the food processor through the feed tube.

As soon as the dough comes together in a ball, remove it from the food processor and divide it into two equal balls, Flatten to a disk and wrap each disk first in parchment paper and then in plastic wrap. Refrigerate the disks until firm, about 1 hour. (The dough can be refrigerated for up to 3 days or frozen for up to 3 months. Thaw in the refrigerator before proceeding with the recipe.)

Peanut Butter Crispy Bars

I have made these bars once before, and they were amazing. I had some requests for them since, so a birthday was coming and I made them again. This recipe is for an 8x8 or 9x9 pan, but I double it and put it in a 9x13.

Baked - Peanut Butter Crispy Bars

Crispy Crust1 3/4 cups crisped rice cereal1/4 cup sugar
3 tablespoons light corn syrup
3 tablespoons unsalted (their recommendation) or salted (what I used, and liked) butter, melted
Layer 1: PB & Milk chocolate5 ounces good-quality milk (their recommendation) or semi-sweet (what I’d use next time) chocolate, coarsely chopped
1 cup creamy peanut butter
Layer 2: Dark Chocolate
3 ounces dark chocolate (60 to 72 percent cocoa), coarsely chopped
1/2 teaspoon light corn syrup
4 tablespoons unsalted butter
Make the crispy crust: Lightly spray a paper towel with nonstick cooking spray and use it to rub the bottom and sides of an 8-inch square baking pan. *I actually just threw wax paper in the pan, and it worked well.
Put the cereal in a large bowl and set aside.
Pour 1/4 cup water into a small saucepan. Gently add the sugar and corn syrup (do not let any sugar or syrup get on the sides of the pan) and use a small wooden spoon to stir the mixture until just combined. Put a candy thermometer in the saucepan. Cook over medium-high heat and bring to a boil; cook until the mixture reaches the soft ball stage, 235 degrees F.
Remove from the heat, stir in the butter, and pour the mixture over the cereal. Working quickly, stir until the cereal is thoroughly coated, then pour it into the prepared pan. Using your hands, press the mixture into the bottom of the pan (do not press up the sides). Let the crust cool to room temperature while you make the next layer.
Make the milk chocolate peanut butter layer: In a large nonreactive metal bowl, stir together the chocolate and the peanut butter. Set the bowl over a saucepan of simmering water and cook, stirring with a rubber spatula, until the mixture is smooth. (*I'm a cheater, and just melt the chocolate in the microwave, and it works fine) Remove the bowl from the pan and stir for about 30 seconds to cool slightly. Pour the mixture over the cooled crust. Put the pan in the refridgerator for 1 hour, or until the top layer hardens.
Make the dark chocolate layer: In a large nonreactive metal bowl, combine the chocolate, corn syrup, and butter.
Set the bowl over a saucepan of simmering water and cook, stirring with a rubber spatula, until the mixture is completely smooth. (*Ok, I cheat here again and just melt my chocolate in the microwave) Remove the bowl from the pan and stir for 30 seconds to cool slightly. Pour the mixture over the chilled milk chocolate peanut butter layer and spread (actually, I found it easier to just roll it around until it coated smoothly, avoiding the risk of picking up any of the peanut butter layer with it) into an even layer. Put the pan into the refrigerator for 1 hour, or until the topping hardens.
Cut into squares and serve. (*These are very rich, so start with small squares, and if people want they can go back for more) The bars can be stored in the refrigerator, covered tightly, for up to 4 days.

Back at it!

So I haven't posted any new things in awhile....
But, I have been really really busy. I did a couple awesome things from the book Baked, and then went on vacation for almost 2 weeks. Now, I'm back at the homemaking.And the best part? Thanks to my awesome coworkers, I'm not armed with a bedazzler! Nothing will be without sparkle again!

Tuesday, May 11, 2010

Batlle Pumpkin

I've had a can of pumpkin in my cupboard staring at me waiting to be used for a while now. So, I finally pulled it out and decided I was going to make some pumpkin chocolate chip cookies. I have always been a big fan of these cookies, but never made them. In looking up recipes to make them, I discovered that a can of pumpkin would make a couple batches. So, instead of just making a double batch of one I would make two different recipes and have a battle to see which is the winner.Recipe one:This one is from AllRecipes.com
  • 1 cup canned pumpkin
  • 1 cup white sugar
  • 1/2 cup vegetable oil
  • 1 egg
  • 2 cups all-purpose flour
  • 2 teaspoons baking powder
  • 2 teaspoons ground cinnamon
  • 1/2 teaspoon salt
  • 1 teaspoon baking soda
  • 1 teaspoon milk
  • 1 tablespoon vanilla extract
  • 2 cups semisweet chocolate chips
  • 1/2 cup chopped walnuts (optional)
  1. Combine pumpkin, sugar, vegetable oil, and egg. In a separate bowl, stir together flour, baking powder, ground cinnamon, and salt. Dissolve the baking soda with the milk and stir in. Add flour mixture to pumpkin mixture and mix well.
  2. Add vanilla, chocolate chips and nuts.
  3. Drop by spoonful on greased cookie sheet and bake at 350 degrees F (175 degrees C) for approximately 10 minutes or until lightly brown and firm.

Recipe 2
This is from FoodNetwork.com
  • 1 cup (2 sticks) unsalted butter, softened
  • 1 cup white sugar
  • 1 cup light brown sugar
  • 2 large eggs
  • 1 teaspoon vanilla extract
  • 1 cup canned pumpkin puree
  • 3 cups all-purpose flour
  • 2 teaspoons baking soda
  • 1/2 teaspoon salt
  • 1 teaspoon ground cinnamon
  • 1/2 teaspoon ground ginger
  • 1/4 teaspoon ground nutmeg
  • 1/4 teaspoon ground cloves
  • 2 cups (12-ounce bag) milk chocolate chips, not semisweet
  • Nonstick cooking spray or parchment paper
Heat the oven to 350 degrees F. Spray cookie sheets with nonstick spray or line them with parchment paper.

Using a mixer, beat the butter until smooth. Beat in the white and brown sugars, a little at a time, until the mixture is light and fluffy. Beat in the eggs 1 at a time, then mix in the vanilla and pumpkin puree. In a large bowl, whisk together the flour, baking soda, salt, cinnamon, ginger, nutmeg, and cloves. Slowly beat the flour mixture into the batter in thirds. Stir in the chips. Scoop the cookie dough by heaping tablespoons onto the prepared cookie sheets and bake for 15 to 20 minutes, or until the cookies are browned around the edges. Remove the cookie sheets from the oven and let them rest for 2 minutes. Take the cookies off with a spatula and cool them on wire racks.

I headed off to work with lots of cookies! After lunch was battle time. I went around the office making everyone eat one of each and tell me which they liked best.

And the results...

Recipe 1: 7 votes and.... Recipe 2: 16 votes!

Congrats to the Food Network people! :) There was a consensus that both were good, but the Food Network recipe edged out the win. (It's the butter, does it every time)

The thoughts were: Recipe 1 was more dense, and had more intense pumpkin flavor. Recipe 2 was more light and fluffy and had a better spice mixture. I'd also like to note that recipe 2 made a lot more cookies than 1 did.


Dressin it up

A few weeks ago I needed to wear an official Girl Scout uniform. Well, I couldn't find a blue dress that I loved. What is a girl to do? Make one!
I made this wrap dress, and it turned out great! Its See & Sew pattern 5166.
Here I am with my work wife in the dress. This is a pattern that I think that I'll use again.

Sunday, May 2, 2010

Cheater Pie

I love pie.
Actually, I should be more clear I love pies that don't have baked fruit. So, fresh peach pie - Yum! Baked peach pie - won't touch it. And basically all cream pies are good to go in my book!
When T or I are wanting some pie, and I don't want to put a lot of work into it this is what I make.This is a banana cream pie, with strawberries and a chocolate crust. Yep...YUM!
This is a cheaters pie, because I just get a pre-made chocolate crust, slice up some strawberries on the bottom.Then make a banana pudding mix, and use the instructions for pie filling and pour it over the top.Let that set, and top with whip cream. And we are doing a cheaters pie, so the whip cream is from the can! :)

Vegas baby (But not really...)

Just spent about a week in the Vegas area with the family (minus one sister and bro in law :( We missed you H&J!) We had a fun time hanging out, not doing Vegasy stuff. We did make it to the strip, but not for long. We hit up M&M world and Coke world and were about done there.
I love the wall of M&Ms in every color you could possibly want.The rest of the time was spent at the park, bowling, Hoover Dam, and just hanging out together. There was a bit of crafting that occurred while there. I have an adorable niece, and I'd seen this great simple idea for a no sew tutu, so of course my little sis and I had to make it for her! I don't have any pictures of it at the moment, but will post some soon. I found a similar one on ehow.com, ours was pink though.The method was really simple. We cut the tulle into strips, and then took a piece of ribbon, and simply tied the tulle onto it. Yep, that simple. We centered the tulle and did an overhand knot, we bunched all the tulle really close so it would be a big, full tutu.